Pop Rocks Cocktail
Rim the top with a lime wedge. Pour a package of cherry-flavored Pop Rocks onto a paper plate. Dip the lime-rimmed cocktail glass into the cherry Pop Rocks, coating the entire rim of the glass. Set the cocktail glass aside.
Add ice and two and half ounces of cranberry vodka to a shaker. Shake the mixture to chill the vodka. Strain the mix and pour into the glass. Slowly pour half an ounce of Blue Curacao into the middle of the glass. If you pour the Blue Curacao carefully, it will settle and twill look festive with different layers of color. Squeeze the rest of the lime juice into the drink and serve.
Cotton Candy Martini
8 ounces of freezing Smirnoff vodka
1 tablespoon of cola
1 teaspoon of Grenadine
A chunk of cotton candy (about 2" x 2")
2 small chunks of cotton candy for garnish
Vanilla Cocktail Candy rim sugar
The mix
Pour all of your ingredients into a martini shaker 1/2 of cracked ice
Drop in the chunk of cotton candy...it will dissolve
Lid the shaker and shake like mad for a full minute
Strain your delicious martini into 2 chilly, sugar rimmed martini glasses
Float a piece of cotton on each cocktail
Enjoy!
Bazooka Bubblegum Cocktail
16 pieces bubblegum, preferably Double Bubble, cut in half
2 cups (16 ounces) vodka
1 tablespoon (1/2 ounce) freshly squeezed lemon juice (from ½ lemon)
1 tablespoon (1/2 ounce) freshly squeezed lime juice (from ½ lime)
1 tablespoon (1/2 ounce) simple syrup
1 cup ice
In large airtight container, combine bubblegum and vodka. Seal and allow to infuse, stirring every 6 hours, for 24 hours. Pour vodka through fine mesh strainer, discarding bubble gum.
In cocktail shaker, stir together 2 ounces bubblegum-infused vodka, lemon juice, lime juice, and simple syrup. Add ice and shake vigorously for 20 seconds. Strain into a chilled coupe glass.
11 April 2010
10 April 2010
Sugar Cookie Bars
Source: www.RecipeGirl.com
COOKIES:
1 cup unsalted butter, at room temperature
2 cups granulated sugar
4 large eggs
2 tsp vanilla extract
5 cups all-purpose flour
1 tsp salt
1/2 tsp baking soda
FROSTING:
1/2 cup butter; at room temperature
1/2 cup shortening
1 tsp vanilla extract
pinch of salt
4 cups powdered sugar (sift after measuring)
5 Tbsp. milk
food coloring, if desired
1. Prepare bars: In a large bowl with an electric mixer, cream butter and sugar until fluffy. Add eggs, one at a time, mixing after each egg. Mix in vanilla.
2. In a separate bowl whisk together flour, salt & baking soda. Add to wet mixture and mix just until combined. Spread on a greased, rimmed baking sheet (use a 13 x 18 pan).
3. Bake at 375 degrees for 10-15 min, until light golden brown or until a toothpick comes out clean. Cool completely before frosting.
4. Prepare frosting: In a large bowl, beat butter and shortening together until smooth and creamy. Mix in vanilla and salt. Add powdered sugar (1 cup at a time) until combined, then add milk & mix until smooth and spreading consistency. Add a few drops of color, if desired. Spread over cooled cookie, then cut into bars.
Yield: 32 bars
Tips:
*Refrigerate the bars until firm… it will be easier to get nice, clean cuts.
Labels:
Childhood Classics,
cookies,
desserts
PW's Favorite Pizza
FOR THE CRUST (MAKES TWO CRUSTS):
1 teaspoon Active Dry Or Instant Yeast
4 cups All-purpose Flour
1 teaspoon Kosher Salt
⅓ cups Extra Virgin Olive Oil
FOR THE PIZZA:
1 whole Large Eggplant (or Two Medium Eggplants)
Kosher Salt, For Sprinkling
1 pint Grape Tomatoes
2 cloves Garlic, Minced
8 ounces, weight Fresh Mozzarella Cheese, Sliced Very Thin
½ cups Freshly Grated Parmesan Cheese
Extra Virgin Olive Oil For Drizzling
Freshly Ground Black Pepper
Preparation Instructions
TO MAKE THE CRUST:
Sprinkle yeast over 1 1/2 cups warm (not lukewarm) water.
In a mixer, combine flour and salt. With the mixer running on low speed (with paddle attachment), drizzle in olive oil until combined with flour. Next, pour in yeast/water mixture and mix until just combined.
Coat a separate mixing bowl with a light drizzle of olive oil, and form the dough into a ball. Toss to coat dough in olive oil, then cover the bowl tightly with plastic wrap and store in the fridge until you need it. ***It’s best to make the dough at least 24 hours in advance, and 3 or 4 days is even better.
TO MAKE THE PIZZA:
Preheat oven broiler.
Slice the eggplant thinly. Sprinkle both sides with kosher salt and place into a strainer in the sink. Allow to sit for 20 to 30 minutes. Rinse eggplant lightly in cold water, then pat the slices dry between layers of paper towels.
Slice grape tomatoes in half lengthwise and toss into a bowl with minced garlic.
Slice mozzarella very thinly.
Cut eggplant slices into fourths, and toss with olive oil. Arrange on a baking sheet and place 8 inches under the broiler.
Broil for 3 minutes, then toss around and broil another 3 minutes. Remove pan from oven and add tomato/garlic mixture. Broil for 2 to 3 minutes, then remove and set aside. (May do this 1 hour in advance.)
Preheat oven to 500 degrees.
Drizzle olive oil on a large baking sheet and use fingers to coat thoroughly. Remove HALF the pizza dough from the bowl. Stretch pizza dough into a large rectangle, pressing with fingers to finish forming. Dough will be very thin.
Lightly drizzle a little olive oil on the dough and use fingers to spread. Lay mozzarella slices over the surface of the dough. Spread vegetables all over the surface of the cheese. Top with Parmesan cheese.
Bake for 10 to 12 minutes, or until crust is golden brown and the cheese is bubbly.
Remove from pan and slice with a pizza cutter. Serve immediately!
Labels:
Childhood Classics,
entrees,
pizza
Caramelized Onion & Prosciutto Pizza
1 whole Pizza Crust
Olive Oil, For Drizzling
1 whole Large Red Onion, Halved And Thinly Sliced
¼ cups Brown Sugar
Kosher Salt To Taste
Parmesan Cheese, Grated
10 ounces, weight Fresh Mozzarella Cheese, Thinly Sliced
8 slices Prosciutto (more To Taste)
Preheat oven to 500 degrees.
Heat 2 tablespoons olive oil in a large skillet. Add onions and brown sugar and toss/stir for several minutes, or until onions are brown and cooked. Set aside.
Roll out pizza dough to a rectangular shape. Drizzle on olive oil, sprinkle on a little salt, followed by a little Parmesan.
Lay slices of mozzarella evenly over the top of the crust. Arrange caramelized onions over the top of the mozzarella. Randomly lay slices of prosciutto over the onions.
Bake for 15 to 17 minutes in the lower half of the oven, or until crust is golden brown. Remove from oven and cut into squares. Serve immediately.
Basic Pizza Crust
1 teaspoon Instant Or Active Dry Yeast
1-½ cup Warm Water
4 cups All-purpose Flour
1 teaspoon Kosher Salt
⅓ cups Olive Oil
Sprinkle yeast over 1 1/2 cups warm (not lukewarm) water. Let stand for a few minutes.
In a mixer, combine flour and salt. With the mixer running on low speed (with paddle attachment), drizzle in olive oil until combined with flour. Next, pour in yeast/water mixture and mix until just combined, and the dough comes together in a sticky mass.
Coat a separate mixing bowl with a light drizzle of olive oil, and form the dough into a ball. Toss to coat dough in olive oil, then cover the bowl tightly with plastic wrap and set it aside for 1 to 2 hours, or store in the fridge until you need it.
Note: it’s best to make the dough at least 24 hours in advance, and 3 or 4 days is even better.
When you are ready to make the pizza, grab HALF the pizza dough (recipe makes 2 crusts) and squeeze the dough toward the bottom to form a nice, tight, pulled ball. You can roll out the pizza with a rolling pin if you’d like, but sometimes it’s just as easy to throw it around and pull and stretch till it feels right. And when the crust is nice and thin, lay it on an oiled baking sheet or pizza pan. Drizzle a little olive oil on the dough and spread it with your fingers. Very lightly sprinkle some salt on the crust.
Labels:
Childhood Classics,
entrees,
pizza
05 April 2010
Bacon Egg and Toast Cups
In my mind, this recipe was the surprise favorite from my personal menu contributions for our Breakfast Themed Dinner Club. Funny how that works since this one had such simple ingredients and was the easiest to make in bulk! Or, maybe it's because this was a blog recipe (vs. All Recipes) and I generally have better luck with those. You can bake up to 2 muffin tins (24 bacon egg and toast cups) at the same time so it's a great recipe to serve for to a crowd. They're great snacking and finger foods which are generally popular in our dinner club crowd. And, they can be saved and re-heated in the oven or toaster oven for later. These made an awesome lazy breakfast the morning following our gorge fest. Yum!
I'll say that I've always been slightly afraid of eating my eggs any way except for scrambled, hard boiled, or in an omelette because there's something about liquidy egg yolks that just gross me out...that and a fear of contracting samonella. The eggs in this recipe when cooked as directed are still runny but you can cook them longer (watchout, this could result in a rubbery egg white though). Since I did make this recipe, I gave the recipe a try...runny yolks and all. I'm happy to report that I did not get sick and I actually enjoyed it! This recipe has converted me..at least in this application. I'm still not a sunny-side up girl and will stick to my fully cooked yolks, if at all, for other egg applications!
I can also see this recipe with a variet of twists - added ham bits, peppers, onions, mushrooms, different types of cheese and/or bread. The possibilities are endless!
The Noshery, the blog from which I found this recipe, also has a version that is french toast cups stuffed with sausage and apples that I'd like to try sometime. I think I'd have more luck with Chris eating that one over this one which is clearly eggy. Of course, with all the other stuff I was making for this round of dinner club, that recipe will have to wait for me to make it another time!
Bacon Egg and Toast Cups
Printer-Friendly Version
Yields: 6 cups (can easily be doubled, tripled, or even quadrupled for a crowd!)
Ingredients
- 6 slices of bread (I used wheat)
- 6 slices of bacon
- 6 eggs
- 1/2 cup of shredded cheese
- salt & pepper, to taste
- Preheat oven to 400 degrees. Spray muffin pan with butter non-stick spray.
- Using a cookie cutter or a wide-mouthed glass, cut circles out of bread slices about 3 inches in diameter. Take bread circles and press them into the muffin pan, set aside.
- Heat a large skillet on medium-high. Cook bacon on the skillet until partially cooked but still pliable, about 3 minutes.
- Shape bacon strips into the toast cups, fill with 1 Tablespoon of shredded cheese. Place in the oven for 5 minutes, allowing the bacon to toast just a little more. Remove from oven.
- Crack an egg and drop a whole egg into the cup, sprinkle with salt & pepper to taste. Repeat for remaining cups. Place back in the oven and cook until white begins to set, about another 8 – 10 minutes. The yolk should be creamy. If a more fully cooked yolk is desired, continue cooking until desired done-ness is achieved.
- Remove from oven when done and pop out using a spoon, serve warm.
Pancake Syrup
This is another item on my Make Your Own Belgian Waffle Bar that was featured in our Breakfast Dinner Club last month. Who would have known that making your own syrup was so easy? This is perfect as your regular syrup or when you're in a pinch and run out of the store-bought stuff. And, it's very cost effective to make. You can store any extra in the fridge and then re-heat it when you're ready to use it again.
Sorry, no pictures of this one but I think you all know what syrup looks like. This one had a nice syrupy consistency and a beautiful dark amber color.
Pancake Syrup
Printer-Friendly Version
Prep Time: 15 Min
Cook Time: 7 Min
Ready In: 30 Min
Yields: 12 Servings
Ingredients
Sorry, no pictures of this one but I think you all know what syrup looks like. This one had a nice syrupy consistency and a beautiful dark amber color.
Pancake Syrup
Printer-Friendly Version
Prep Time: 15 Min
Cook Time: 7 Min
Ready In: 30 Min
Yields: 12 Servings
Ingredients
- 3/4 cup packed brown sugar
- 1/4 cup sugar
- 3/4 cup water
- 1/2 cup light corn syrup
- 1/2 teaspoon maple flavoring
- 1/2 teaspoon vanilla extract
- In a saucepan, combine the sugars, water and corn syrup; bring to a boil over medium heat. Simmer for 7 minutes or until slightly thickened.
- Remove from the heat; stir in maple flavoring and vanilla.
- Cool for 15 minutes. Serve over pancakes, waffles or French toast.
Labels:
breakfast,
condiments
Strawberry Topping
This Strawberry Topping was made for our March Breakfast Themed Dinner Club as part of our Make Your Own Belgian Waffle Bar. It was rediculously simple to make and tasted very fresh. I added some lemon juice to brighten up the flavor. Excellent on waffles, pancakes, ice cream, or cheesecake!
Strawberry Topping
Printer-Friendly Version
Prep Time: 15 Min
Cook Time: 5 Min
Ready In: 35 Min
Yields: 4 Servings
Ingredients
Strawberry Topping
Printer-Friendly Version
Prep Time: 15 Min
Cook Time: 5 Min
Ready In: 35 Min
Yields: 4 Servings
Ingredients
- 1 pint strawberries, cleaned and stemmed
- 1/3 cup white sugar
- 1 teaspoon vanilla
- 1 Tablespoon lemon juice
- Cut about 1/3 of the strawberries in half.
- In a saucepan over medium high heat, combine uncut strawberries, sugar, vanilla, and lemon juice. Cook, stirring occasionally and smashing strawberries with spoon as they soften, until sauce thickens, about 5 minutes.
- Remove from heat. Add remaining 1/3 of cut strawberries into cooked mixture. Store in refrigerator to cool before serving over waffles, pancakes, ice cream, or cheesecake.
Labels:
breakfast,
desserts,
fruit,
strawberries
Belgian Waffles
These Belgian Waffles were made for our Breakast Themed dinner club last month and were the star of our Make Your Own Waffle Bar. They are extremely light and fluffy in texture. We put out chocolate chips, peanut butter chips, chopped pecans, blueberries, bananas, strawberry topping, whipped cream, powdered sugar, and syrup so that people could put their personal touch to their waffles.
The original recipe says the beat the whites and yolks separately to create a light and airy waffle but I don't think this is necessary because by the time you let the batter rise and go to cook the waffles, the air that was whipped into the whites would have separated. If you want to do this step, however, I suggest mixing the beaten egg whites into the risen batter just before cooking. Because this recipe uses yeast as the leavening agent, you do need to allow some advance preparation. Some reviews say that you can mix the ingredients together the night before and then allow it to come up to temperature and finish rising the next morning so that you can have fresh waffles bright and early.
It was interesting to see how as people started to arrive and our house began to get warm from the body heat, the yeast in the batter really went into over-drive and got extra airy. At the end of the night, we had some extra batter leftover so I made them up and let them cool before freezing them in a ziplock baggy. They re-heat really well in the toaster (like an Eggo)!
Sadly, I don't have a picture of any waffles but I do have a picture of the waffle bar setup itself.
Belgian Waffles
Printer-Friendly Version
Prep Time: 15 Min
Cook Time: 20 Min
Ready In: 1 Hr 35 Min
Yields: 8 Waffles
Ingredients
- 1 (.25 ounce) package active dry yeast (2.5 tsp)
- 1/4 cup warm milk (110 degrees F/45 degrees C)
- 3 large eggs
- 2 3/4 cups warm milk (110 degrees F/45 degrees C)
- 3/4 cup butter, melted and cooled to lukewarm
- 1/2 cup white sugar
- 1 1/2 teaspoons salt
- 2 teaspoons vanilla extract
- 4 cups all-purpose flour
- In a small bowl, proof yeast by dissolving the yeast in 1/4 cup warm milk. Let stand until small bubbles form and it looks frothy, about 10 minutes.
- In a large bowl, whisk together the eggs, 1/4 cup of the warm milk and the melted butter. Stir in the yeast mixture, sugar, salt and vanilla. Stir in the remaining 2 1/2 cups milk alternately with the flour, ending with the flour. Cover the bowl tightly with plastic wrap. Let rise in a warm place until doubled in volume, about 1 hour.
- Preheat the waffle iron. Spray waffle iron with cooking oil and spoon about 1/2 cup (or as recommended by manufacturer) onto center of iron. Close the lid and bake according to manufacturer directions. Serve immediately or keep warm in 200 degree oven.
Country Fried Steak
This post is about the Country Fried Steak (sometimes known as Chicken Fried Steak)...one of my favorite unhealthy breakfast entrees! The flavor of this one was good but we all know I don't like to fry stuff so I have NO IDEA why I chose to take this task on. Especially given that I had to fry up 10 of them and was running out of time (guests arrived when I was just starting to fry)! I don't think I did a very good job paying attention to making sure the oil was at a good frying temperature because some of the breading ended up soggy and others a little burnt. And, the meat was tougher than I would have liked. Perhaps if you made a smaller batch you could be more attentive and it would turn out better. Like I said, great flavor but not the best execution which was entirely my fault. (Good thing I made other delectable goodies to make up for this less than stellar one!)
Pardon the awful picture. Like I said it was a busy day in the kitchen and I think I bit off more than I could chew for this one. To be honest, I'm surprised I got a shot at all! Oh and by the way, this is the reason I had a TON of buttermilk leftover and hence all of the other recipes to use it all up!
Country Fried Steak
Printer-Friendly Version
Prep Time: 20 Min
Cook Time: 20 Min
Ready In: 40 Min
Yields: 4 Servings
Ingredients
For the Steaks
- 4 (1/2 pound each) beef cube steaks
- 2 cups all-purpose flour
- 2 teaspoons baking powder
- 1 teaspoon baking soda
- 1 teaspoon black pepper
- 3/4 teaspoon salt
- 1 1/2 cups buttermilk
- 1 egg
- 1 tablespoon hot pepper sauce (e.g. Tabasco™)
- 2 cloves garlic, minced
- 3 cups vegetable shortening for deep frying
- 1/4 cup all-purpose flour
- 4 cups milk
- kosher salt and ground black pepper to taste
- Pound the steaks to about 1/4-inch thickness.
- Place 2 cups of flour in a shallow bowl. Stir together the baking powder, baking soda, pepper, and salt in a separate shallow bowl; stir in the buttermilk, egg, Tabasco Sauce, and garlic.
- Dredge each steak first in the flour, then in the batter, and again in the flour. Pat the flour onto the surface of each steak so they are completely coated with dry flour.
- Heat the shortening in a deep cast-iron skillet to 325 degrees F (165 degrees C). Fry the steaks until evenly golden brown, 3 to 5 minutes per side. Place fried steaks on a plate with paper towels to drain. If needed, keep steaks warm by placing in a warm oven.
- Drain the fat from the skillet, reserving 1/4 cup of the liquid and as much of the solid remnants as possible. Return the skillet to medium-low heat with the reserved oil. Whisk the remaining flour into the oil. Scrape the bottom of the pan with a spatula to release solids into the gravy. Stir in the milk, raise the heat to medium, and bring the gravy to a simmer, cook until thick, 6 to 7 minutes. Season with kosher salt and pepper. Spoon the gravy over the steaks to serve.
21 March 2010
Brummy Bread (aka "Breakaway Coffee Cake")
Note - we doubled the below recipe (I've never only made the serving size below! :))
2 loaves frozen bread dough
1 stick butter or margarine
1 small pkg. regular vanilla pudding (NOT instant!)
1-cup brown sugar
2 tablespoons milk
1-teaspoon cinnamon
Thaw bread but do not let rise.
Cut one loaf into small pieces and place in 9” X 13” greased pan (use large pan).
Combine remaining ingredients in saucepan over low heat until butter/margarine is melted.
Pour over bread pieces in pan.
Spread chopped nuts over top if desired. (Who would do that?!)
Cut second loaf of bread into small pieces and drop over mixture in pan.
Cover and let rise to twice its size and refrigerate overnight (we usually just let it rise overnight in the basement).
Bake at 350 degrees for 25 – 30 minutes.
When done, cool slightly and then turn upside down onto rack, into large serving dish or large box.
Serve warm. (Um, yeah. Clearly)
Fresh Fruit Tart with Vanilla Pastry Cream
Ingredients:
For the tart dough:
1 large egg yolk
1 tbsp. heavy cream
1/2 tsp. vanilla extract
1 1/4 cups all-purpose flour, plus more for dusting the work surface
2/3 cup confectioners’ sugar
1/4 tsp. salt
8 tbsp. cold unsalted butter, cut into 1/2-inch cubes
For the pastry cream:
2 cups half-and-half
1/2 cup sugar
Pinch salt
5 large egg yolks
3 tbsp. cornstarch
4 tbsp. cold unsalted butter, cut into 4 pieces
1 1/2 tsp. vanilla extract
For the topping:
You can use whatever fruit you want as topping.
I used:
8 large strawberries, sliced
2 large kiwis, peeled, and sliced
1/2-1 cup blueberries
Apple jelly, for glazing
Directions:
To make the tart shell:
Whisk together the egg yolk, cream and vanilla in a small bowl; set aside. Place the flour, sugar, and salt in a food processor.
Process briefly to combine.
Scatter the butter pieces over the flour mixture.
Process to cut the butter into the flour until the mixture resembles coarse meal, about fifteen 1-second pulses.
With the machine running, add the egg mixture and process until the dough just comes together, about 12 seconds.
Turn the dough onto a sheet of plastic wrap and press into a 6-inch dish.
Wrap in plastic wrap and refrigerate at least 1 hour or up to 48 hours.
Remove the dough from the refrigerator. (If refrigerated for more than an hour, let stand at room temperature until malleable.)
Unwrap and roll the dough out on a lightly floured surface to a 13-inch round.
Transfer the dough to a 9-inch tart pan.
Mold the dough to the sides of the tart pan and remove the excess off the top.
Set the dough-lined tart pan on a large plate and freeze for 30 minutes.
Meanwhile, adjust an oven rack to middle position.
Preheat the oven to 375° F.
Set the dough-lined tart pan on a baking sheet, press a 12-inch square of foil into the frozen shell and over the edge, and fill with pie weights.
Bake for 30 minutes, rotating halfway through the baking time.
Remove from the oven and carefully remove the foil and weights.
Continue to bake until deep golden brown, 5-8 minutes longer.
Transfer to a wire rack to cool.
To make the pastry cream
Heat the half-and-half, 6 tablespoons of the sugar, and the salt in a saucepan over medium-high heat until simmering, stirring occasionally to dissolve the sugar.
Meanwhile, combine the egg yolks and remaining 2 tablespoons sugar in a medium bowl
Whisk until the sugar has begun to dissolve and the mixture is creamy, about 15 seconds.
Whisk in the cornstarch until combined and the mixture is pale yellow and thick, about 30 seconds.
When the half-and-half mixture has reached a simmer, slowly add it to the egg yolk mixture to temper, whisking constantly.
Return the mixture to the saucepan, scraping the bowl with a rubber spatula.
Return the mixture to a simmer over medium heat, whisking constantly, until a few bubbles burst on the surface and the mixture is thickened and glossy, about 30 seconds.
Off the heat, whisk in the butter and vanilla.
Strain the pastry cream through a fine mesh sieve set over a medium bowl.
Press plastic wrap directly on the surface to prevent a skin from forming.
Refrigerate until cold and set, at least 3 hours and up to 2 days.
NOTE: Vanilla pudding also works well as a subsititute to the pastry cream. I found this out the hard way when the pastry cream didn't set in time..
To assemble the tart
Spread the cold pastry cream evenly over the bottom of the tart shell.
Arrange the fruit on top of the pastry cream as desired.
Heat the jelly in the microwave for 20-30 seconds, just until slightly melted and easy to stir. Using a pastry brush, paint a light layer of jelly over the fresh fruit.
Source: Modified as seen on Annie's Eats and originally from Baking Illustrated
Fruit Bruschetta
Ingredients:
16 ½-inch-thick slices crusty Italian or French bread
2 tablespoons melted unsalted butter
1½ tablespoons sugar
1½ tablespoons cinnamon, or to taste
1 peach, peeled, pitted, and cut into fine dice
½ banana, cut into fine dice
8 large strawberries, cut into fine dice
3 to 4 tablespoons plain yogurt (I used vanilla for added flavor)
Directions:
Preheat oven to 375°F.
Arrange bread slices in one layer in a shallow baking pan.
Bake in middle of oven until golden, about 10 minutes.
Brush toasts with butter on one side.
1. In a small bowl, stir together 1 tablespoon sugar and 1 tablespoon cinnamon.
2. Sprinkle mixture evenly over buttered side of each toast.
3. Broil toast about 5 inches from heat under preheated broiler 30 seconds, or until tops are bubbling.
4. Let the toast cool.
4. In a bowl, stir together prepared fruit.
5. Add remaining ½ tablespoon sugar and ½ tablespoon cinnamon to the fruit and stir.
6. Mound about 1 tablespoon of the fruit/sugar/cinnamon mixture on each toast.
7. Drizzle each toast with yogurt.
Source: Peach, Strawberry, and Banana Bruschetta from Gourmet August 1994; As seen on Crumbly Cookie.
Labels:
appetizers,
bread,
breakfast,
fruit
21 February 2010
Chocolate Chip Cookie Dough Truffles
Mmmm...well, we all know that Chris loved these truffles (as evidenced by Emily's photo on facebook and the fact that he ate like half a dozen on his own) but I'm pretty sure that others loved them too because I only came home with about 10 of them and started with at least 30. I could eat the cookie dough batter straight up with a spoon, too. And, the best part about this recipe is that there's no eggs in it so you can eat the cookie dough to your hearts content without worrying about contracting samonella or other nasties!
This is a really easy recipe to make. I'd also consider using this cookie dough to use as part of homemade chocolate chip cookie dough ice cream. Chris is requesting that I make a peanut butter version sometime...but...I think that's called a Buckeye (which, I do have a separate recipe for that one!) lol.
I added some shortening to the chocolate coating. This change is reflected in the recipe below and learned from a different recipe that I use. I find that the shortening allows for a shinier coating and makes for a thinner and softer chocolate coating. I hate it when the chocolate snaps off when you bite into it...this helps with that!
Combined with the Heart-Shaped Red Velvet Whoopie Pies, they made a very cute Valentine's Day Love at First Bite dessert presentation (see above). Beware though, the small size makes it deceiving and you can snack your way through quite a few in a short time!
Chocolate Chip Cookie Dough Truffles
Printer-Friendly Version
Ingredients:
- 8 tbsp. unsalted butter, at room temperature
- Pinch of salt
- ¾ cup light brown sugar, packed
- 2¼ cup all-purpose flour
- 1 (14 oz.) can sweetened condensed milk
- 1 tsp. vanilla extract
- ½ cup mini semisweet chocolate chips
- 1½ lb. semisweet (or bittersweet) chocolate, coarsely chopped or semisweet chocolate chips
- 1 1/2 Tbsp. vegetable shortening or vegetable oil
- Mini chocolate chips (for garnish)
- Combine the butter and sugar in a mixing bowl and cream on medium-high speed until light and fluffy, about 2 minutes. Beat in the salt, flour, sweetened condensed milk and vanilla until incorporated and smooth. Stir in the chocolate chips. Cover with plastic wrap and refrigerate until the mixture has firmed up enough to form balls.
- Shape the chilled cookie dough mixture into 1-1½ inch balls. Place on a baking sheet lined with wax paper. Cover loosely, transfer the pan to the freezer and chill for 1-2 hours.
- When ready to dip the truffles, melt the chopped chocolate and shortening or oil in a heatproof bowl set over a pot of simmering water. Dip each chilled truffle, one at a time, coating in chocolate and shaking gently to remove the excess. (If at any point during dipping, the cookie dough balls become too soft, return to the freezer to chill for 30 minutes.) Transfer to a wax-paper lined surface. If using mini chocolate chips for garnish, sprinkle on top quickly after dipping each truffle before the chocolate sets. Once all the truffles have been dipped, store them in the refrigerator until ready to serve.
Labels:
candy,
chocolate,
desserts,
truffles,
Valentine's Day
Red Velvet Whoopie Pies
I made these heart shaped so they'd really match our Valentine's Day Love at First Bite Theme but they'd be great any time of year in the traditional round shape, too. I won't lie, I was pretty scared about the full bottle of red food coloring that goes into this but that's how you get the beautifully vibrant red color of the cake. Avoid getting it on your hands and clothing though or you may end up a bit stained until you can scrub it back off! I never piped anything prior to recipe but it was pretty easy and the heart shapes (see my pic below!) made this dessert extra cute. And, I got to use my awesome cake decorating tools that I bought from Michael's for 60% off!
I was able to make about 16 fully assembled pies out of this recipe but that may vary depending on the size of the cookie that you make. These hand-held pies are perfect for picking up and snacking on for a sweet treat!
Red Velvet Whoopie Pies
Printer-Friendly Version
Ingredients:
For the cookies:
I was able to make about 16 fully assembled pies out of this recipe but that may vary depending on the size of the cookie that you make. These hand-held pies are perfect for picking up and snacking on for a sweet treat!
Red Velvet Whoopie Pies
Printer-Friendly Version
Ingredients:
For the cookies:
- 2 cups all-purpose flour
- 2 tbsp. cocoa powder
- ½ tsp. baking powder
- ¼ tsp. salt
- 8 tbsp. unsalted butter, at room temperature
- 1 cup light brown sugar, packed
- 1 large egg
- 1 tsp. vanilla extract
- ½ cup buttermilk, at room temperature
- 1 oz. red food coloring
- 8 oz. cream cheese
- 5 tbsp. unsalted butter, at room temperature
- 2 tsp. vanilla extract
- 2½ cups confectioners' sugar, sifted
- Preheat the oven to 375˚ F.
- To make heart-shaped whoopie pies: Using a heart template cut out from card stock or a heart shaped cookie cutter, trace evenly spaced hearts onto pieces of parchment paper sized to fit two cookie sheets. Place the parchment on the cookie sheets so that the side you have drawn on is facing down; set aside.
To make regular round whoopie pies: Place parchment paper on cookie sheets and set aside. - In a medium bowl, whisk together the flour, cocoa powder, baking powder and salt. In the bowl of a stand mixer fitted with the paddle attachment, cream together the butter and brown sugar on medium-high speed until light and fluffy, about 2 minutes. Beat in the egg until incorporated, scraping down the sides of the bowl as necessary. Blend in the vanilla. With the mixer on low speed, beat in about a third of the dry ingredients, followed by half of the buttermilk, beating each addition just until incorporated. Repeat so that all the buttermilk has been added and then mix in the final third of dry ingredients. Do not overbeat. Blend in the food coloring.
- To make heart-shaped whoopie pies: Transfer the batter to a pastry bag fitted with a large plain round tip. Pipe the batter onto the parchment paper using the heart tracings as a guide.
To make regular round whoopie pies: Spoon heaping tablespoons on batter onto parchment paper. - Bake 7-9 minutes or until the tops are set. Transfer cookies to a cooling rack. Repeat with any remaining batter. Allow cookies to cool completely before proceeding.
- To make the cream cheese frosting, in the bowl of a stand mixer fitted with the paddle attachment beat the cream cheese and butter on medium-high speed until well combined and smooth, about 2-3 minutes. Mix in the vanilla extract. Gradually beat in the confectioners’ sugar until totally incorporated, increase the speed and then beat until smooth.
- Transfer the frosting to a clean pastry bag fitted with a plain, round tip. (Alternatively, you can spoon heaping tablespoons of frosting onto each cookie and spread, leaving the edges clear). Pair the cookies up by shape and size. Flip one cookie of each pair over so that the flat side is facing up. Pipe frosting onto the flat-sided cookie of each pair, leaving the edges clear. Sandwich the cookies together so the flat sides are facing each other and press gently to help the filling reach the edges. To store, refrigerate in an airtight container.
Labels:
cake,
cookies,
desserts,
Valentine's Day
Sausage Puffballs
2 pounds bulk pork breakfast sausage (half mild and half seasoned, such as sage)
1 cup pork-flavored stuffing mix (measure first, then grind into coarse crumbs in a food processor if necessary or use a
3 ounces cream cheese, at room temperature
1/3 cup grated Parmesan cheese (not the canned variety)
1/4 cup minced sweet onion
1/4 cup chunky salsa
1/4 cup seedless raspberry jam
1/4 cup small capers, minced
1/8 cup minced fresh parsley
1 egg, lightly beaten
1 teaspoon kosher salt, or to taste
1/4 teaspoon ground chipotle chile pepper
Optional Dipping Sauce:
1/4 cup seedless raspberry jam
1/2 cup prepared salsa
Preparation:
Preheat oven to 400 F. Line rimmed baking sheets with parchment paper or Silpats.
Combine pork sausage, stuffing crumbs, cream cheese, Parmesan cheese, sweet onion,salsa, raspberry jam, capers, parsley, egg, salt, and chipotle chile pepper in a large bowl until thoroughly mixed but avoid over-handling.
Cut puff pastry into 1-1/2-inch squares. Roll sausage mixture into 1-inch balls and wrap in puff pastry squares, stretching to cover. Place seam-side down on prepared pan. Bake about 15 to 20 minutes until golden and cooked through. Serve warm or at room temperature.
For optional dipping sauce, combine raspberry jam and salsa. Serve with sausage puffballs.
Yield: about 80 pieces
Labels:
appetizers,
sausage,
Valentine's Day
Fancy Macaroni
Courtesy of Pioneer Woman: LINK
4 cups Macaroni
8 Tablespoons Butter (Salted Butter)
2 whole Medium Onions, Cut In Half And Sliced Thin
10 slices Regular Bacon
1 Tablespoon Bacon Grease (reserved From Bacon Slices)
¼ cups All-purpose Flour
2 cups Whole Or 2% Milk
½ cups Half-and-Half
2 whole Egg Yolks, Beaten
Salt And Pepper, to taste
½ cups Grated Gruyere Cheese
½ cups Grated Fontina Cheese
½ cups Grated Parmigiano Reggiano Cheese
4 ounces, weight Chevre (soft Goat Cheese)
Preparation Instructions
Preheat oven to 350 degrees.
Cook macaroni for half the time of the package instructions. Drain and set aside. Fry bacon until slightly, but not overly, crispy. Drain on a paper towel. Reserve grease.
Melt 4 tablespoons butter in a skillet and then saute onions over medium-low heat for 10 to 12 minutes, or until golden brown and soft. Set aside.
In a pot, melt 4 tablespoons butter (and add 1 tablespoon of the reserved bacon grease for good measure!). Sprinkle in flour and whisk to combine. Cook, stirring constantly, over medium heat for 1 minute. Pour in milk and half & half, then cook for 3 to 5 minutes or until thick. Reduce heat to low. Add salt & pepper to taste. (Do not undersalt!)
Beat egg yolks and drizzle 1/4 cup hot mixture into the yolks, stirring constantly. Stir to combine. Pour egg mixture into sauce and cook for another minute.
Add cheeses and stir until melted. Add onions and bacon and stir. Taste for seasonings and add more salt if needed. Add cooked macaroni and stir to coat.
Pour into a baking dish and bake for 15 to 20 minutes or until sizzling and hot. Serve with red meat or a green salad.
Labels:
bacon,
cheese,
pasta,
side dish,
Valentine's Day
Alfredo Green Bean Casserole
Adapted from: http://www.pillsbury.com/Recipes/ShowRecipe.aspx?rid=14102 & http://allrecipes.com/Recipe/Easy-Alfredo-Sauce-I/Detail.aspx
For this recipe you can either buy the jar of Alfredo Sauce, or make the Sauce yourself. Both options will work.
INGREDIENTS
2 bags (1 lb each) frozen cut green beans
1 can (8 oz) sliced water chestnuts, drained
1/2 cup roasted red bell peppers (from 7-oz jar), cut into small strips
1/4 teaspoon salt
1 container (10 oz) Alfredo pasta sauce (store-bought or homemade)
1 can (2.8 oz) French-fried onions
DIRECTIONS
1. Spray inside of 3- to 4-quart slow cooker with cooking spray. In large bowl, mix all ingredients except onions. Stir in half of the onions; spoon mixture into slow cooker.
2. Cover; cook on Low heat setting 3 to 4 hours, stirring after 1 to 1 1/2 hours.
3. About 5 minutes before serving, in 6-inch skillet, heat remaining half of onions over medium-high heat 2 to 3 minutes, stirring frequently, until hot. Stir bean mixture; sprinkle with onions.
ALFREDO SAUCE:
INGREDIENTS:
1 pint heavy whipping cream
1/2 cup butter
1 1/2 cups grated Parmesan cheese
DIRECTIONS
1. In a medium saucepan combine whipping cream, butter or margarine, and grated Parmesan cheese.
2. Cook over medium low heat until smooth.
3. Remove from heat. Sauce will thicken upon standing.
Labels:
green beans,
side dish,
Valentine's Day,
vegetables,
vegetarian
10 January 2010
Icelandic Torte - Vinarterta
This dessert is an Icelandic dessert - in honor of the Ice Palace in Iceland in Die Another Day!
Icelandic Torte (Vinarterta)
Ingredients
2 pkt (12-Oz) prunes -- Pitted, Dried
2 cup water
3/4 cup Sugar
1 tsp vanilla extract
3/4 tsp Caramom Seed -- Crushed
1/4 tsp salt
TORTE LAYER
4 cup all-purpose flour -- Sifted
2 tsp baking powder
1/2 tsp salt
1 cup butter -- Softened
1 cup Sugar
1 tsp vanilla extract
2 x eggs
1/4 cup milk
TO SERVE
confectioner's sugar
whipped cream
Directions
Make Filling: In a 3 quart saucepan, place prunes and 2 cups water; heat to boiling. Reduce heat, and simmer, covered, 30 minutes, or until prunes are very tender.
Drain prunes, reserving liquid. Chop prunes finely. Add 3/4 cup granulated sugar, 1 teaspoon vanilla; the cardamom, 1/4 teaspoon salt, and 1/2 cup reserved cooking liquid; mix until ingredients are well blended. Set aside to cool.
Make torte layers: Sift flour with baking powder and salt. In a large bowl, with electric mixer at high speed, beat butter with granulated sugar and vanilla until light and fluffy. Add eggs, one at a time, beating well after each addition. At low speed, add flour mixture alternately with milk, beginning and ending with flour mixture. Refrigerate dough until chilled and easy to handle-about 20 minutes. Preheat oven to 350 degrees. Divide dough into 7 equal pieces. For each layer, invert an 8-inch round layer cake pan. Flatten a piece of dough with hands; place on pan; pat to fit. Then gently roll to make layer even; trim edge if necessary. Keep pieces of dough refrigerated until ready to use. Bake 15 to 20 minutes, or until edge is golden brown. Carefully remove to wire rack; let cool.
To assemble: Place one layer on serving plate; spread with about 1/2 cup filling. Repeat with 5 more layers and remaining filling. Set last layer on top. Cover completely with plastic film or foil. Refrigerate at least 24 hours, to mellow. To serve: Sprinkle top with confectioners Sugar. Cut in thin slices. Pass whipped cream. Return unused portion to refrigerator.
Labels:
007 casino royale,
desserts
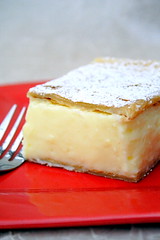
Vanilla Slice - Krempita
In honor of Casino Royale, this is a dessert popular in Southeastern Europe -- where the Casino Royale itself took place, in Montenegro.
Vanilla Slice - Krempita
2 sheets of puff pastry
1.5 l / 6 1/3 cups milk
150 g / 5 ¼ oz corn starch
3 packets (9g each) vanilla sugar
To make Vanilla Sugar without having to use Vanilla Beans (Which are rare and expensive in Grocery Stores) just use Vanilla Extract and Sugar in a ratio of one teaspoon of Vanilla Extract to every two cups of regular granulated sugar. Then spread the well mixed vanilla sugar on a baking pan lined with wax paper to dry.
8 egg yolks
200 g / 7 oz sugar
8 oz whipping cream + 1 stabilizer (gelatin)
Let the puff pastry sheets thaw, the roll them out on a lightly floured surface, and bake according to directions on a jelly roll pan. Let them cool, and then cut out the shape according to the size of the square pan you will use. I used 9 inch x 13 inch. Once you cut them to the shape of the pan, cut one sheet into squares (I made 12); that will be the top of the cake.
Cream: Mix egg yolks with sugar, until frothy. Add a cup of milk (out of the 6 1/3 cups), and corn starch, and mix well. Set the reminder of milk with vanilla sugar added, to boil, and when it comes to a boil, slowly mix in the yolk mixture, and stir constantly for a minute. Transfer to a large mixing bowl, and let cool completely. When cooled, add the whipped whipping cream, whipped with a stabilizer.
Now put the whole sheet on the bottom of the pan, and spread the filling over it. Arrange the cut out sheet on top. Refrigerate for few hours before serving. Dust with powdered sugar.
Instead of the top sheet of puff pastry, you can put whipped cream, and so on. Suit yourself, and enjoy : )
Labels:
007 casino royale,
desserts
Sushi
Below are the basic ingredients for sushi. You can then buy fillings of your choice to make various delicious rolls.
I highly suggest Sushi Day for inspiration and recipes...there's even some rolls with BACON! (Bacon Crunchy Shrimp Roll and Kristen Maki).
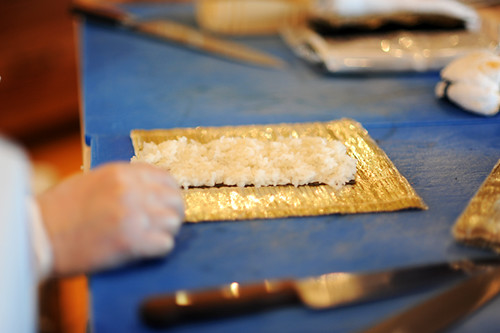
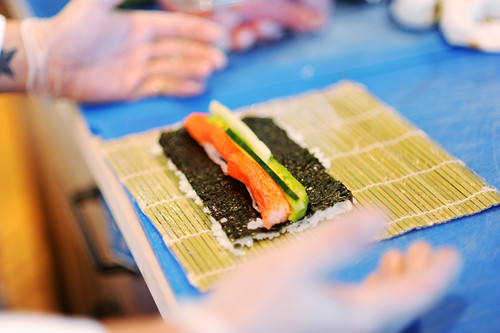
Pioneer Woman has an awesome tutorial with really good pictures (very helpful if you're a visual person like I am!) on how to create your rolls. There's also a few good recipes on there as well.
Mmmm...good thing Emily took pictures of my rolls because I forgot to!
As I wasn't sure how adventures our group of Dinner Clubbers would be, I opted for all cooked (and inside out so you can't see the nori (seaweed) - out of sight, out of mind right?) maki rolls. For my rolls, I made the standard California Roll and then did some Spicy Crab Rolls and just a few Shrimp Rolls.
Sushi Rice
(Source: Cody the Sushi Chef as seen on Pioneer Woman)
Prep Time: 30 minutes
Cook Time: 20 minutes
Yields: 8 cups cooked rice or about 16 rolls
Ingredients
Instructions
“Rice Prep”
Sushi Su/Sushi Rice:
Spicy Mayonnaise
(Source: Group Recipes)
Ingredients
(Source: Pioneer Woman)
Ingredients and Supplies
I highly suggest Sushi Day for inspiration and recipes...there's even some rolls with BACON! (Bacon Crunchy Shrimp Roll and Kristen Maki).
Pioneer Woman has an awesome tutorial with really good pictures (very helpful if you're a visual person like I am!) on how to create your rolls. There's also a few good recipes on there as well.
Mmmm...good thing Emily took pictures of my rolls because I forgot to!
As I wasn't sure how adventures our group of Dinner Clubbers would be, I opted for all cooked (and inside out so you can't see the nori (seaweed) - out of sight, out of mind right?) maki rolls. For my rolls, I made the standard California Roll and then did some Spicy Crab Rolls and just a few Shrimp Rolls.
Sushi Rice
(Source: Cody the Sushi Chef as seen on Pioneer Woman)
Prep Time: 30 minutes
Cook Time: 20 minutes
Yields: 8 cups cooked rice or about 16 rolls
Ingredients
- 4 cups Short Grain/sushi Rice, uncooked
- 1 cup Rice Wine Vinegar
- ½ cups Sugar
- ¼ cups Sake Or Mirin (a Japanese Rice Wine)
Instructions
“Rice Prep”
- Use short or medium-grain rice. It’s more starchy and round than the long-grain variety, which just won’t hold together well enough to support ingredients in sushi. Many stores now sell specifically-labeled “sushi rice”.
- Before you cook it, wash/rinse the rice until the water runs totally clear—about five or six times. If you don’t thoroughly rinse the rice, it’ll end up in a big, sticky ball. There’s enough internal starch in the rice for it to sufficiently hold together for sushi, so get all the stuff on the outside off by rinsing well.
- Use a rice cooker/steamer. Rice made on the stovetop will not work for sushi; it won’t be the right consistency. Rice cookers are widely available for as low as $12.
- Add the rinsed rice to the rice cooker with equal parts water, and follow the directions for the rice cooker. After it’s done, transfer the cooked rice to a large mixing bowl.
Sushi Su/Sushi Rice:
- Heat vinegar, sugar, and sake or mirin in a saucepan just to dissolve and combine. Allow to cool to room temperature. (Note: skipped this step as I just subbed pre-made seasoned rice wine vinegar)
- Cook rice according to rice cooker directions. Transfer to large mixing bowl.
- Pour su (vinegar mixture) over the rice, gently folding to incorporate.
- Let rice stand for 10 minutes, then fold again.
Spicy Mayonnaise
(Source: Group Recipes)
Ingredients
- ½ cup (low-fat) mayonnaise
- 2 Tbsp Sriracha hot sauce
- ¼ tsp roasted sesame oil
- Whisk the ingredients together until well blended.
- Store in fridge until ready to use. Use in rolls or as a dipping/drizzled sauce.
(Source: Pioneer Woman)
Ingredients and Supplies
- 1 piece Makisu (bamboo Rolling Mat)
- Dark Green Nori (dried Seaweed)
- Sushi Rice (recipe above)
- Imitation Crab (round leg style)
- Avocado, Thinly Sliced
- Cucumber (Japanese, If Available), Thinly Sliced
- Toasted Sesame Seeds
- Soy sauce, for dipping
- Wasabi, if desired (used prepared Wasabi in a tube that I bought at Kroger)
- Ginger, if desired
- First, in order to keep your rice from sticking to the Makisu and making a terrible mess, carefully wrap the Makisu in plastic cling wrap.
- To begin, fold the pieces of nori in half to split them. Nori is very delicate, so as soon as you press along the seam, it easily breaks in two. Next, lay the half-sheets of nori on the work surface and grab a handful (about a ½ cup) of sushi rice and cover one side of a half-sheet of nori with it. To do so, first set the rice on the end of the nori sheet closest to you. Then, working with your fingertips and/or knuckles, gently spread the rice over the surface of the nori.
- On California Rolls, the rice is typically on the outside – not the inside – so to begin, quickly flip the rice-coated sheet of nori so that the rice side is down. Carefully position it horizontally so it will roll lengthwise. Next, place a single row of the crab across the middle of the nori. Next, place slices of avocado end to end right against the crab. It’s best to use an avocado that’s ripe but still quite firm. Lastly, lay the very thin (slightly thicker than a matchstick) cucumber slices end-to-end right alongside the crab and avocado.
- To roll the sushi, carefully lift the edge of the mat closest to you, begin rolling the mat away from you, pressing it lightly to keep it firm. At this point, the end of the roll has been rolled upward, and your very light pressure is ensuring that they roll will remain nice and tight. Next, lift up the end of the rolling mat and pull it away from you, allowing the roll to roll the rest of the mat. Then carefully remove the roll from the mat and place it on a cutting board. Lay the mat over the top of the roll and exert gentle pressure once more to make sure it’s all secure.
- Next, hold the roll on the mat and sprinkle the top with toasted sesame seeds. Slice using a very sharp knife, first running the knife through a damp dishtowel with the blade facing away from you. Begin by slicing the roll exactly in half. Then set the two halves side-by-side to slice into individual pieces. This ensures that each piece will be a uniform size.
- Wrap in plastic cling and store in refrigerator until ready to serve. Serve with soy sauce, wasabi, and pickled ginger, if desired.
Labels:
007 casino royale,
appetizers,
Asian,
bacon,
Japanese,
seafood,
vegetables,
vegetarian
Pajeon - Korean Pancake!
Pajeon- Korean Pancake
Adapted from whats4eats and DavidLebovitz
Another Actual pic! Order this up at most Korean places as an app! Or just eat it as a snack-meal! You can put anything you want in it- we picked seafood, but you can put kim chi, meat, anything! (i was just thinking about it, don't try fruit or chocolate or candy pieces)
Ingredients: (Makes one 9-inch (23cm) pancake)
1/2 cup (70g) all-purpose flour
1/2 cup (125ml) ice-cold water
1/2 teaspoon salt
1 large or extra-large egg, lightly beaten
1 bunch of scallions
a spoonful of soy sauce
optional: dried red pepper slices
additional: prawns, squid, crab, chicken, corn, bits of seaweed, tofu, mushroom slices, kimchi, asparagus slices, or some other cooked or shredded vegetables
Procedure
Tip - I find a non-stick skillet yields best results, but if you use a cast iron, be sure to add enough oil to prevent the pancake from sticking. I use relatively high heat since I want a nice, browned crust.
1. Stir together the flour, water and salt until just mixed.
2. Chop the green parts of the scallions into 3-inch (10cm) lengths. Reserve the white parts for another use
3. Heat a thin layer of vegetable oil in a 9 or 10-inch (23-26cm) skillet, preferably non-stick, until hot. Fry the scallions until they're completely cooked through and soft. Add a touch of soy sauce to the pan when they're almost done, to season the scallions.
4. If using other ingredients, any vegetables, kimchi, or prawns—what have you‐add them now, then toss a few times to heat them through.
5. Pour the pancake batter over the scallions (and other stuff in the pan), spreading the batter, and cook a few minutes until the bottom is nice and brown underneath. Lift the edge to peek.
6. Pour the beaten egg on top then swirl the pan to even out the egg a bit, still keeping it pretty uneven. Distribute the dried pepper strands over the egg, if using, and cook until the egg is just beginning to firm near the edges.
7. Using a wide spatula, flip the pancake and cook for another minute or two until the egg is set and preferably crispy at the edges. (I tend it cook it pretty well, although I like hard-cooked fried eggs, which I know ain't "gourmet", so use your judgment.)
5. Slide pancake onto a cutting board, then cool to room temperature. Cut into six or eight wedges, and serve with dipping sauce made by mixing 3 parts soy sauce with 1-2 parts rice vinegar and a few drops of sesame oil. A bit of chile oil can also be added.
Labels:
007 casino royale,
appetizers,
Asian,
Korean,
seafood,
side dish
Pao de queijo - Brazillian Cheese Bread
"Pao de queijo"- Brazillian Cheese Bread
Adapted from comments from whats4eats
If you've ever been to Brazillian steakhouse/meat buffet, you've had these awesome cheese balls before eating and know they are addictive. Here they are in your own kitchen!
Actual picture!!
Ingredients:
1 lb (450 - 500 g) Polvilho azedo (Sour or fermented Tapioca/Cassava flour)
[We found this in Jungle Jim's as Manoic flour in the Brazil/Hispanic section, whatever that is]
1 cup (240 mL) whole milk
1 cup (240 mL) filtered water
3 medium eggs beaten
1 tsp (5 mL) common salt
1/2-cup (120 mL) cooking oil
6-8 oz Parmesan cheese (grated)
Procedure:
1. Mix milk, water, oil, and salt well in a large metallic container.
2. Bring it to boil. Turn off heat.
3. Mix polvilho well with a wooden spoon/spatula. Let it cool so you can knead. [At least 10-15 minutes, if you can let it cool longer, it will be easier to handle and the puffs turn puffier]
4. Add beaten eggs and knead until smooth. It'll be too sticky. Have patience.
5. Gradually mix cheese until the dough stops sticking in your hand. Knead well.
6. Make 1-inch balls and place them on a baking pan with some space between them for expansion.
7. Pre-heat oven at 350 degrees Fahrenheit and put the pan on the bottom rack.
8. Let it cook for 20 to 30 minutes depending on the size of the ball until slightly brown.
[Made about 40 puffs]
Labels:
007 casino royale,
appetizers,
bread,
cheese,
side dish
Golden Cheddar and Broccoli Soup
Source: http://allrecipes.com/Recipe/Broccoli-Cheese-Soup-VII/Detail.aspx
Ingredients
1-2/3 (10 ounce) packages frozen broccoli
4 cups and 2 tablespoons milk
4 cups and 2 tablespoons cubed processed cheese
1/2 cup and 1 tablespoon all-purpose flour
1-2/3 cups heavy cream
1-2/3 cubes chicken bouillon
3/4 teaspoon salt
3/4 teaspoon ground black pepper
Directions:
1. Place broccoli in a medium saucepan with just enough water to cover. Cook until tender, about
8 minutes. Set aside and do not drain water.
2. In a large saucepan, heat milk. Blend in the flour and cheese until smooth. Stir in the cream
and bouillon cube. Add the broccoli and it's water to the mixture and season with salt and
pepper. Heat soup to warm and serve immediately.
Labels:
007 casino royale,
broccoli,
cheese,
soup
Subscribe to:
Posts (Atom)